
 We had to make 1 quilt block 12.5” square. Three thoughts struck me when I opened the envelope.....
1. That's nice fabric
2. There's not much of it
3. Oh dear........There's not much room for error on this one
As a relative beginner (I say 'relative' as this is my second quilt block project don't you know), I decided to make a few notes.....
The Requirements:
*The block must have 2 colours with equal amounts of white.
Ok got it.
* The square must consist of smaller squares. Examples given (and following my research what the examples given look like as I had no idea!):
Nine patches
photo courtesy of kylydia.wordpress
 oh I get it
Four Patches
I can guess what that one looks like
Half Square Triangles
photo courtesy of heidielliott
 i'm getting the hang of this now
 Flying Geese
what the heck! who is coming up with these names?
photo courtesy of maggi.m Ahh I see
*No big stars
(little ones were ok but as I wasn't sure what the whole star thing was about I decided to stay away from anything star shaped whatsoever).
The Plan:
Anyway my thought process was (yes there was a thought process this time), that as I had only 2 colours and white, 9 patches may look a bit plain. I decided to do half square triangles but mix them up a bit to get a bigger overall pattern.
There was a note in the instructions that said:
“If anyone is feeling brave a block made entirely of 1 inch squares would be fab!”
Due to my lack of block experience I didn't understand the difficulty of doing 1” squares but at the same time I understood you needed to be brave to do it so I quickly divided my big 12inch square into 3inch squares (4 equal rows and 4 equal columns).
My finished block needs to be 12.5 inches so Karen can finish it to 12 inches. So each of the finished 4 blocks across needed to be 3inches (with ¼ inch seam allowance around the edges left for Karen to sew in). Initially I failed to add a seam allowance for sewing the blocks together. Then got all a bit puzzled and then found this rule for making half square triangles:
'Whatever you want your finished block to be add 7/8inch'
Firstly this was a bit of a pain to me because (a) I dont work in inches so hate working in eighths of inches and (b) I kept making test squares and they were still wrong! Then I found on the net (what did we do before the internet?) that someone said add an inch as you can always trim it a bit. Perfect!
So Tip 1 in making half square triangles:
Cut your squares 1inch bigger than you want your final square to be.
The fabric grain (don't switch off like I used to when hearing the dreaded 'fabric grain' phrase) is really easy. You can find the selvages of the fabric as the strongest grain runs parallel to this. This rule is fine before you cut all the selvages off ready for sewing or when you've got a table full of half square triangles and you need to sew them together! Easiest is to pull your fabric left and right and then again top to bottom. The strongest grain has less pull and that's what you want all running in the same direction.
So I cut out 4 red squares (each 4inch square), 4 green and 8 white.
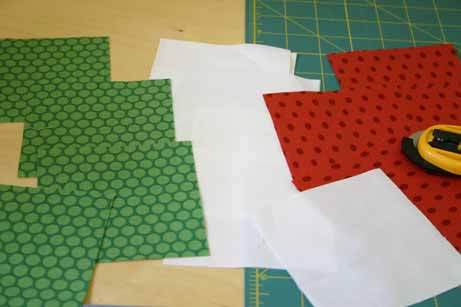 You can cut a square diagonally to get your triangle and then sew the two half triangles together. However I found that method to be rubbish because it's fiddly to get the triangle through your sewing machine (it pulls the corner of your triangle in) and the fabric all goes a bit stretchy.
Much easier is to pin 2 squares together, then draw a pencil line down the diagonal. I had a 1/4inch foot on so I used the pencil line as a guide and stitched either side of the pencil line.


The cut down the pencil line, press and voila, you have 2 half square triangles! You also feel you are going twice as fast doing it this way :)
Occasionally you have to double check you are sewing on the correct diagonal so that when opened up your grain (and print if applicable) are going the right way. Apart from that, once you've got all your squares cut it is like a little conveyor belt. If you then want to go even faster you can do this:
Get all your pinned squares with pencil lines lined up. Sew one line and don't cut the thread, just push the next one through. Then remove a whole string of them from the machine and cut the threads.
Tip 2 in making half square triangles:
Don't cut the fabric into triangles and then sew but rather cut into squares, sew and then cut.
After creating all of the half square triangles and sewing each row together I then began to attach the rows to each other.
I ironed the seams flat (I don't go in for all of that pushing the seams to the same side as it makes it bulky so I am a flat seam person).
Although I had been so precise in my cutting and 1/4” seams, one of my rows just wouldn't line up perfectly with its neighbour row.
where's my seam ripper?
 I reattached 'problem' row three times with the same result. It was a millimeter out here and there. I went on a big research mission on the net to work out how to get all the seam points to match up and I found a couple of things:
You can do this – match your seam points and put a pin in the centre of your seam to hold it. Or even fractionally edged your top seam further forward before pinning as the top fabric may push back a bit as it goes through your machine, so by edging it forward you are counteracting the push back.
Or you can do this – don't get hung up on the seam points! I'm a perfectionist and to start with it was really getting to me. Then I read a lot of experienced quilters on the net saying that you need to step back and look at the bigger picture and not study the block with a magnifying glass. Some even said they stopped quilting because aiming for perfection meant they lost the enjoyment in it.
Tip 3 in making half square triangles:
Yes be precise but if your seam points are slightly off it doesn't matter. Look at the overall block not the tiny details.
So step back (and if your seams are really bad - step back AND squint) and I think my finished block isn't too bad for my second ever quilting effort.......

Encouraged by my new found love of imperfection I had another go at a half square triangle block. I whipped up this boat block using reds, oranges and whites by Saffron Craig, Laurie Wisbrun and Hoodie.
I am really pleased with it. The points don't match perfectly everywhere but I don't notice that now.
When I look at this block I see a perfect boat.
.............albeit a boat that I wouldn't necessarily trust to hold up in the open sea :)
You did really well Courtney, your block looks brill and i love the saffron craig boat :)
ReplyDeleteI think both blocks look great. I get total sewing anxiety when making blocks for others too. I always worry mine is going to be the one that ruins the quilt (or the block that gets put on the back!)
ReplyDelete@Maria
ReplyDeleteThank you!
One day I may actually do a whole quilt!
@A
ReplyDeleteoh no .... i'd never even thought of the worst case senario being put on the back!
Karen....please don't put my block on the back!
lol I won't put it on the back, promise. I recieved it last week and its perfect just what I ordered :)With points once you have a huge quilt full of them you dont notice the odd millimeter here and there and points not matching, well I dont anyway!
ReplyDeleteThankyou Karen xx
@Breezy Bree
ReplyDeletephew! I can at least sleep well tonight now :)
Courtney your block is gorgeous!
ReplyDeleteI did mine last night and hate hate hate it - it is definitely for the back!
I've found in my stash some fabric to match what Karen sent so am going to try making another.
Thanks for all your wee hints/tips too
@Cat B
ReplyDeleteoh no! I bet it isn't as bad as you think. have you uploaded it to the flickr group for help/opinions or are you just going to start over?
p.s I'm currently locked out of flickr (think I must have done something naughty!).
Love the blocks Courtney!
ReplyDeleteIt looks brilliant and you are so thorough - thanks for all your tips! Your boat is fabby. Hope flickr co-operates soon! Juliex
ReplyDeletegreat post - really really funny and I like the boat a lot! Those pesky triangles and those pesky quarter inches!
ReplyDelete