 I always say i'm a sewer not a quilter and no joking, in the past i've thrown bigger pieces out (quilters please don't faint – I no longer do that!)!!!
Again I nervously, I mean faithfully, looked through the notes and the finished block was to be:
11 inches;
No wonky strips;
No embellishments;
Iron all seams open; and
¼” seam allowance.
This time we were making a Spiderweb pattern. I had no idea what a Spiderweb pattern was. Thankfully Crystal sent links to tutorials and this was my favourite spiderweb tutorial.
I have to say, even after glancing over the tutorials I had a minor freak out because:
(a) I was running 9 days over the deadline which put me in a tizz!;
(b) I'm not the best at folding fabric on angles and it opening out at the angle I intended; and
(c) It all looked really difficult, mathematical, difficult and difficult.
After calming down and reading everything again this is what I concluded:
- All the maths is really to create the kite template (the bit in the middle), once that is made no maths needed.
- You can make a paper template to make sure that the pieces of fabric you sew are going to cover the right area. Some people sew through the paper template and later rip it off and some people just place the paper template underneath before attaching a strip and remove it without sewing into it.
- Alternatively you can attach your strips to a triangular piece and later cut it down to form the central kite shape.
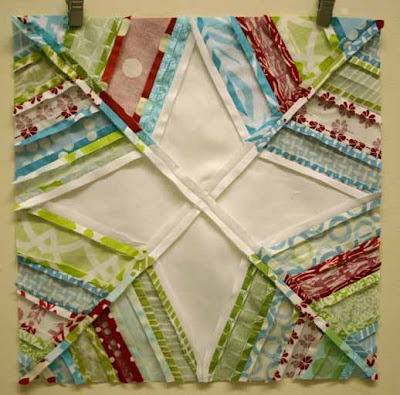
Crystal had really kindly sent 4 precut white kites. Yeay no maths!
After sorting the strips out into same length sizes (and pondering whether they were sent in same length sizes before I emptied the contents of the envelope out onto my cutting table and then pondering why I always think of these things too late),..
 I made a triangle paper template. I couldn't quite figure out how to decide how big the paper template should be for an 11” finished square so I googled it. Still couldn't work it out. So then I made the biggest triangle I could from an A4 sheet and started sewing.
 The only tricky bit came after sewing one side of strips to the kite moving on to the other side. I wasn't sure how to attached the other longest strip so that the kite point was in the right place. Turns out that as long as you're using 1/4” seam allowance (or if your pattern says otherwise) then it will line up fine.
 After attaching strips to both sides of the kite shape I pressed the seams open and then cut the excess from the point of the kite. I decided not to cut the outside until after I had attached all the kites together so I could make sure the final block was exactly 11”.

 So after making four pieces...
 I then attached two together....
 Then attached the two halves together. I would say take this bit slowly and try and line up the centre points and the parts where the colour meets the white kites.
This block really suited my style of sewing, basically messy! You can attach the strips really quickly and you don't have to tidy the block up until the end. I'm also really pleased with the back which in the past has been a bit all over the place but your joins only meet when attaching the 4 segments together. Turns out my first thoughts were wrong again:
The tiniest scraps can be used to make beautiful things;
Spiderwebs are really easy and sew up really fast;
They look daunting but trust me, suitable for even a novice like me. I suspect the hardest part is in the cutting which Crystal did. Thank you Crystal!
Here is my finished 3rd block!
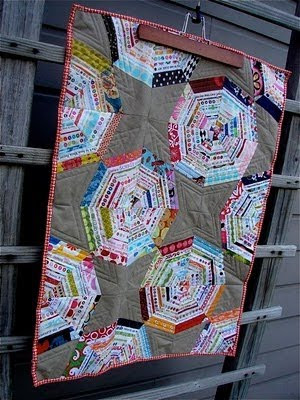
Whilst looking around for Spiderweb blocks I saw this brilliance:
 A Spiderweb block made from selvages! Made slightly different but a great tutorial shown here by Tallgrass Prairie Studio.


OMG I have a HUGE bag of selvages! Look at that! I am so going to try that one out! I too freaked when I saw what was wanted from us, I too am a sewer who has recently discovered quilting etc this year so think of my skill level WAY below everyone elses in the BEE. But from reading flickr I've noticed a lot of us felt the same when we first looked at this and felt the same at the end! FANTASTIC blocks, actually rather easy to do and can't wait to see the finished product. I enjoyed reading your outlook on them xxx
ReplyDeleteTake care xxx
Cat
You've just answered my question!
ReplyDeletehttp://flyingblindonarocketcycle.blogspot.com/search/label/selvedges
Thank you. Your block is great, very impressed!
I have also pulled out lots of fabric to make a spiderweb quilt as I liked mkaking the block so much. Karen x
ReplyDelete@Cat B
ReplyDeleteHi Cat! Thanks for your comment. Let me know how you get on with the selvage spiderweb. I've seen other selvage tutorials including funky pin cushions and an arm rest to put sewing stuff in whilst watching tv :)
@Flying Blind...
ReplyDeleteoh good! thanks for leaving your comment :)
@Breezy Bree
ReplyDeleteHi Karen
me too. i like anything that looks harder than it is (I definitely dont like anything that looks easy when it's not!).
Great! I knew there was a reason i was obsessively keeping the smallest of scraps... cant wait to give it a go.
ReplyDelete@sarah_shetland
ReplyDeleteHi Sarah
Thanks for your comment!
Let us know how you get on :)
That looks so impressive. I'm a new quilter, having found my old baby quilt (made by my Mum from my first dresses) and discovering pretty fabrics to horde, but one day soon I'm going to venture beyond hexagons... if I ever finish my mammoth hexagon quilt, that is ;)
ReplyDelete